Friday, 14 August 2015

Windows 8 : Configure Personal Mail on Windows 8 Device

By default when the Mail app is launched it prompts to sign into a Microsoft account. See the screenshot below...


We need to disable this prompt by enabling a GPO manually. The GPO will then allow to configure an Enterprise account. See the screenshot below...


To enable the Group Policy manually on the Windows 8 device go to
Computer Configuration -> Administrative Templates -> Windows Components -> App runtime -> Allow Microsoft accounts to be optional (Enable this policy)


Configuration Steps :

1. On the Start screen, tap or click Mail.


2. You will now be prompted to setup an Enterprise Account, click on Show more details


3. Populate these details and click on Connect.

• Email Address - your mail address
• Server Address – You mail address server
• Domain - to be left blank
• User Name - your mail address
• Password - Your mail address password


4. Click on Enforce these policies. Mails will now sync with the device.


5. To access Calendar, on the Start screen tap or click Mail


Labels: , , ,

Thursday, 3 January 2013

Windows 8 Keyboard Shortcuts


Windows 8 Keyboard Shortcuts


F1 : Help
F2 : Rename a File.
F3 : Open Search.
F4 : Display Address bar list.
F5 : Refresh.
F6 : Cycle Forward through elements in a window or dialog box.
F7 : Display command history in a command prompt.
F10 : Display hidden Menu bar.
F11 : Toggle full screen display.

Alt : Displays a Hidden Menu Bar.

Alt + D : Select the Address Bar.
Alt + Tab : Goes forward through open windows.
Alt + Shift + Tab : Goes backward through open windows.
Alt + F : Closes the active window. Open the shut down dialog box from the desktop.
Alt + Space : Access the shortcut menus for current window.
Alt + Esc : Cycles between open programs in the order that they were opened.
Alt + Enter : Accesses the Properties dialog box of the selected item.
Alt + Prnt Scrn : Take a screenshot of the active window and place it in the clipboard.
Alt + Up Arrow : Move up one folder Level in windows explorer.
Alt + Left Arrow : Display the Previous Folder.
Alt + Right Arrow : Display the Next Folder.


Shift + Insert : Load CD/DVD.
Shift + Delete : To Delete file or Folder Permanently, rather than sending it to the Recycle Bin
Shift + F6 : Cycle Backward through elements in a window or dialog box.
Shift + F10 : Accesses the context menu for the selected item.
Shift + Click : Selects a group of items which don't to be next to each other.
Shift + Click on Task Bar Program : Launch a new instance of a program.
Shift + Right-Click on Task Bar Program :Opens the context menus of the selected program. 


Ctrl + A : To select all items.
Ctrl + C : To Copy the selected items.
Ctrl + D : To Delete the selected items.
Ctrl + E : To select Search box in the upper corner of a window. 
Ctrl + N : To Open a new window in windows explorer.

Ctrl + V : To Paste the selected items.
Ctrl + W : To Close current window in windows explorer.
Ctrl + X : To Cut the selected items.
Ctrl + Y : To Redo an action.
Ctrl + Z : To Undo an action.

Ctrl + Tab : Move forward through tabs.
Ctrl + Shift + Tab : Move backward through tabs.
Ctrl + Shift + N : Creates a New Folder.
Ctrl + Shift + Esc : Opens the Windows Task Manager.
Ctrl + Alt + Delete : Access the windows security screen.
 

Num Lock + Plus(+) : Displays the contents of the selected folder.
Num Lock + Minus(-) : Collapses the selected folder.
Num Lock + Asterisk(*) : Expands all sub-folders under the selected folder.

Windows Key : Open/Close the Start Screen.
Windows key + B : Takes attention to Notification area.
Windows key + C : Access the Charms Bar in right side.
Windows key + D : Shows Desktop (Minimizes all windows).
Windows key + E : Opens  File Explorer / My computer.
Windows key + F : Search for files via the Search charm.
Windows key + H : Opens Share Charm.
Windows key + I : Opens the Settings Charm.
Windows key + K : Opens the Devices Charm.
Windows key + L : Locks your PC and returns you to the lock screen. (without signing out)

Windows key + M : Minimizes active windows.
Windows key + O : Lock screen orientation (portrait/landscape) for tablet/slate PCs.
Windows key + P : To connect to projector or second screen.
Windows key + Q : Search within Apps via Search Charm.
Windows key + R : Opens Run Prompt.

Windows key + T : View Task Bar Programs status.
Windows key + U : Opens Ease of Access control panel.
Windows key + V : View all active Notifications.
Windows key + W : Searches on Settings.
Windows key + X : Opens a System menu at bottom left corner containing many advanced and useful shortcuts.
Windows key + Z : Opens the App Bar in a Windows Store app.

Windows key + Tab : Opens a list of running programs.
Windows key + Enter : Opens Narrator.
Windows key + Prnt Scrn : Takes a screenshot and places is in the screenshots folder in the Pictures folder.

Windows key + , : Makes all current windows transparent and shows up desktop temporarily as long as you hold the windows key.

Windows key + . : To move screen split to the right or left side.
Windows key + Shift + . : To move screen split to the right or left side.
Windows key + Ctrl + F : Opens Find Computer Dialog box
Windows key + 1..9 : To Open the programs pinned at Task bar at that position (left to right)
Windows key + Shift + 1..9 : To Open a New instance of the programs pinned at Task bar at that position (left to right)
Windows key + Tab : Shows up all the running apps in left side and one can easily switch among them.
Windows key + F1 : Windows Help and Support.
Windows key + Home : Minimize all except current window.

Windows key + Up Arrow : Maximize current window.
Windows key + Down Arrow : Minimize or restore current window.
Windows key + Left Arrow : Tile window on the left side of screen.
Windows key + Right Arrow : Tile window on the right side of screen.

Labels: ,

Disable Lock Screen in Windows 8


Windows 8 has Lock Screen when you starts your computer or log out or lock it. If you disable this lock screen, you can increase your system start up speed. Once you disable it, you would get login screen instead of lock screen. Although Microsoft doesn't provide any option to disable lock screen at user level. but you can disable it through Group policy.

Step 1. Open Run Prompt. Type "gpedit.msc" and hit Enter.


Step 2. Go to Computer Configuration\Administrative\Templates\Control Panel\Personalization.

In the Right Pane double click on "Do not display the lock screen".


Step 3. Enable it and click on Apply and OK.


Restart your computer...

Done.

If you have any doubt or faced any difficulty to disable lock screen, simply drop a comment...

If you liked this post, follow us on Twitter, Facebook or Google Plus to get latest updates about Windows 8

Labels: , , ,

Thursday, 27 December 2012

Remove Previous Windows Installation (Windows.old folder) after Upgrading to Windows 8


You can install +Windows 8  with two methods. Clean Format or Upgrading the window.

If you do Clean Format, your computer will format that partition and will install a fresh coy of windows 8. There won't be windows.old folder in that partition.

But if you Upgrade to Windows 8, your computer will upgrade the older version of windows to windows 8. The program files and folders of previous windows will be moved to windows.old folder. 
Now this may be good idea to delete Windows.old folder from this partition to save some disk space, as this folder could be holding more space of your hard disk.

Windows.old folder contents system files So you can't delete this folder by pressing Shift+delete key. Windows 8 has a utility called 'Disk Cleanup'. We can use this utility to Remove Older Windows Installation.

Follow these steps to Remove Windows.old folder :


Step 1. Open Disk Cleanup Utility. 

Method 1. Open Run Program Prompt. Type "cleanmgr" and press enter.

Method 2. Go to Start menu and type cleanup. Select Setting Tab in Right side. and then click on "Free up disk space by deleting unnecessary files" option.

Step 2. Select Drive (Mostly C: Drive) and click on OK.

Step 3. Click on Clean up system files option.

Step 4. Select Drive again(Mostly C: Drive) and click on OK.

Now there is Previous Windows Installation(s) option in files to delete box. 

Step 5. Select Previous Windows Installation(s) Option and click on OK.

You will be asked to permanently delete these files.

Step 6. Click on Delete files option.

If you liked this post, follow us on Twitter, Facebook or Google Plus to get latest updates about Windows 8
 

Labels: , ,

Wednesday, 26 December 2012

How to Shut Down Windows 8 in Just One Click


Windows 7 has shut down option directly in start menu, but in +Windows 8 Windows 8 you need to perform more steps to turn off your PC. In order to Turn Off your computer you need to open Setting charm Menu (Simply Press Windows Key + i from keyboard) > Click on Power Option > Select Shut Down or Restart. Boring na.....
How about this, if we can SHUTDOWN or RESTART computer directly from desktop or start menu. good idea na. Actually you can do it by making shortcuts for both (shutdown and restart) processes.

❖ Follow these steps to make shutdown and restart shortcuts : 

Step 1. Right click on desktop & select New > Shortcut

Step 2. Type shutdown /s /t 0 for shutdown and shutdown /r /t 0 for restart shortcut in the location box and click on Next.


Step 3. Enter a name for shortcut and click on Finish.
This will create a new shortcut on desktop.

Step 4. Right Click on the shortcut and Select Properties.
 In the dialog box click on Change icon under the Shortcut Tab.

 Click on OK in warning box.

Step 5. Select an icon from the list or browse icon if you have one. After that click OK twice.

Now shortcut icon will be changed. 

Step 6. Right click on the shortcut and Select Pin to Start.

Now Shutdown icon will display on Start Menu.

Step 7. Right click on shortcut and Select Pin to Taskbar, iif you want the shorcut to appear on taskbar of desktop.

Now Shutdown icon will display on Task bar.

Done!

If you have any doubt or faced any difficulty making shortcut, simply drop a comment


If you liked this post, follow us on Twitter, Facebook or Google Plus to get latest updates about Windows 8
 

Labels: ,

Wednesday, 19 December 2012

Remove Build 8400 Evaluation Copy Watermark from Windows 8 Release Preview


Windows 8 Release Preview edition has a Watermark on desktop So anybody would know that you are using a Preview Version of +Windows 8, But what if you can remove it :D 


Yup.. in this article I will teach you “How to remove Windows 8 Release Preview Evaluation Copy. Build 8400 Watermark “ from the Desktop.

To do this you just need to install a application called “My WCP Watermark editor”. The application will remove the watermark from desktop permanently in just few clicks.

Follow these instructions to remove watermark from windows 8 :

Download My WCP Editor. 


Run My WCP Watermark Editor. 


Clear the “Edition, Build, Restriction note” fields and click on ‘Apply new settings’ button.

Now application would start watermark removal process and after is is done, computer will ask you to “Reboot your computer”.


Reboot your PC.

Once your computer reboot, Start windows 8 and change your desktop wallpaper and the watermark would be gone.

Done!

If you have any doubt or faced any difficulty removing the watermark, simply drop a comment


If you liked this post, follow us on Twitter, Facebook or Google+ to get latest updates about Windows 8

Labels: , ,

Tuesday, 18 December 2012

8 Reasons to Upgrade to Windows 8


Everyone is so interested to know about +Windows 8 . Windows 8 is a big change in Market and of course in Microsoft too. Some People think that windows 8 is heavy OS but they should know everything about windows 8 before changing their mind. Know more about Windows 8.....

1. Better Battery Life : It is designed for Low-voltage CPU and battery. There is no need of Power-source to use Apps. Only for Notification, system will use some power. By installing windows 8, you can increase your battery backup time by 40 % in laptop. SO if you are using windows 7, upgrade it. 2. Faster Boot Times : Windows 8 boot time is faster than windows 7. So You can enjoy windows 8 on your old laptop too. Now i think you don't need to put your laptop into "Sleep" mode, Upgrade to Windows 8 now.

3. Windows 8 editions : There are two versions of windows 8 in the market.

For laptop and desktop, there is a Pro Version of windows 8.
For Tablet, there is a RT Version of Windows 8.
4. Better Security : When you start computer, Windows 8 creates a secure Boot Path. Secure boot checks the windows 8 OS for virus detection.

5. In-built Application Store : Windows 8 has in-built Windows Store to download apps. Windows Store contents all comfortable apps for windows 8. Microsoft is working to gather large list of applications in the store, for now it has limited apps.

6. Sync : Windows 8 has almost all Microsoft Products in-built like, Windows messenger, Mail, Sky Drive, Maps, Windows Store, Xbox Music & Video. Windows 8 almost kept everything in Sync.

7. Native ISO Image Support : New Feature, SO now you don't need to install Magic Disk or any other Iso related software to access ISO image files. Windows 8 has in-built native support for ISO images files.

8. Inexpensive : Windows 8 Pro Upgrade is really inexpensive. It costs 2200 rupees. It is almost half of windows 7 upgrade.


If you liked this post, follow us on Twitter, Facebook or Google Plus to get latest updates about Windows 8

Labels: , , , ,

Thursday, 13 December 2012

How to Enable or Disable Store App in Windows 8


Windows Store has ability to download new applications on Windows 8 PC. Are you tired of removing application from your pc which are installed by someone else ? Did you know you can block people to add new application to your PC.

To do this you must Login through your Administrator Account.  and then Follow these steps :

Step 1. Open Run Program Prompt. Type "gpedit.msc" and press enter.

Step 2. In Left Lane Click on the "User Configuration" > Administrative Templates > Windows Components > Open Store Menu". 

Step 3. In Right Side window open " Turn off the Store application" option.


Step 4. If you want to Disable Store App than Select Enable and click on OK.

If you want to Enable Store App, Select Disable or Not Configured.

Step 5. Done! Now close the Group Policy Editor Window. 

 Now when you start Store App on your Windows 8, you will get this message " Windows Store isn't available on this PC. Contact your system administrator for more information."

Labels: , , , , , ,

Tuesday, 11 December 2012

Install Windows 8 on VMWare Workstation 8


Windows 8 logo
VMWare has launched Workstation 9 version, Which supports Windows 8, HTML5, USB 3.0 and latest processor. It also supports multi-touch features, Intel Ivy Bridge processor, Open GL 2.1 on Linux and 3D graphics.
On the other hand, VMWare announced Fusion 5 and Fusion 5 Professional for Apple Users. Fusion 5 contents 70 new features for you. Even you can install Windows 8 directly on the mac by Fusion. 

In this article we are using VMWare Workstation 8 for Windows 8 installation.

Step 1. Make sure you have Windows 8 installer DVD or iso image. If you don't have then download from Microsoft Website or Purchase it.
Step 2. Install VMWare Workstation. If you don't know How to Install VMWare Workstation, Follow this Link.
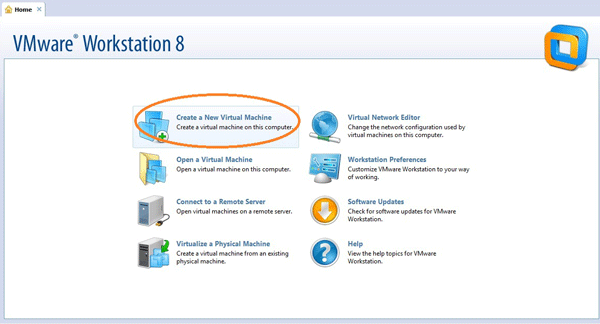
Step 3. Start VMWare Workstation and click on "Create a New Virtual Machine" option (or Press CTRL+N Key).

vmware workstation 8 screen 
Step 4. Select "Typical (recommended)" and click on "Next". 
 

Step 5. Select "Installer disc image file (iso)" option and click "Browse" then Locate the Windows 8 ISO image, select the image and click "Open".
 
  
Step 6. Select "Other" option in Guest operation system and version. Click on "Next".
 

Step 7. Name your Virtual machine, like i named "Windows 8" in this article. Click on "Next". 
 

Step 8. Specify Disk Capacity. Change it to 20GB and click on "Next".

Step 9. Click on "Customize Hardware" option.

Step 10. Increase the Memory Size from 256MB to 2GB, as Windows 8 (64-bit) requires 2GB Memory. Click on "Close".

Step 11. Click on "Finish" option.

Now Virtual Machine would Start Windows 8 installation.
Windows 8 on vmware 8


Now you know How to install Windows 8. If you don't know then follow this Link " how to install Windows 8".

Labels: , , , , ,